Difference between revisions of "Scarlett Ezel"
| Line 16: | Line 16: | ||
== Loot Table == | == Loot Table == | ||
| + | |||
| + | <table class="wikitable sortable"> | ||
| + | <tr> | ||
| + | <td align="left" valign="top"> | ||
| + | <center>'''[[Items|Boss Items]]'''</center> | ||
| + | [[File:Boss Coin2.gif|link=]] [[Boss Coin Shop|boss coin]]<br> | ||
| + | [[File:Relic Chest.gif|link=]] [[Relics#Relic_List|relic chest]] | ||
| + | |||
| + | [[File:Attunement Item 2.gif|alt=]] [[Soul Attunement|soul of timira the many-headed]] | ||
| + | |||
| + | [[File:Midnight Tunic.gif|link=]] [[Armors|midnight tunic]] | ||
| + | |||
| + | [[File:Dawnfire Sherwani.gif|link=]] [[Armors|dawnfire sherwani]] | ||
| + | |||
| + | [[File:Midnight Sarong.gif|link=]] [[Legs|midnight sarong]]<br>[[File:Dawnfire Pantaloons.gif|link=]] [[Legs|dawnfire pantaloons]] | ||
| + | |||
| + | [[File:Frostflower Boots.gif|link=]] [[Boots|frostflower boots]] | ||
| + | |||
| + | [[File:Feverbloom Boots.gif|link=]] [[Boots|feverbloom boots]] | ||
| + | |||
| + | [[File:Naga Quiver.gif|link=]] [[Quivers|naga quiver]]<br>[[File:Turtle Amulet.gif|link=]] [[Amulets|turtle amulet]] | ||
| + | |||
| + | [[File:Naga Wand.gif|link=]] [[Wands|naga wand]] | ||
| + | |||
| + | [[File:Naga Rod.gif|link=]] [[Rods|naga rod]] | ||
| + | |||
| + | [[File:Naga Crossbow.gif|link=]] [[Crossbows|naga crossbow]] | ||
| + | |||
| + | [[File:Naga Axe.gif|link=]] [[Axes|naga axe]]<br>[[File:Naga Mace.gif|link=]] [[Clubs|naga mace]] | ||
| + | |||
| + | [[File:Naga Blade.gif|link=]] [[Daggers|naga blade]] | ||
| + | </td> | ||
| + | <td align="left" valign="top"> | ||
| + | <center>'''Other Items'''</center> | ||
| + | [[File:Crystal Coin.gif|link=]] 3-6x crystal coin | ||
| + | |||
| + | [[File:Piece of Timira's Sensors.gif|link=]]piece of timira's sensors<br>[[File:One of Timira's Many Heads.gif|link=]]one of timira's many heads | ||
| + | </td> | ||
| + | <td align="left" valign="top"> | ||
| + | <center>'''[[Liquids]]'''</center> | ||
| + | [[File:Ultimate Mana Potion.gif|link=]] 1-16x ultimate mana potion<br> | ||
| + | [[File:Ultimate Spirit Potion.gif|link=]] 1-16x ultimate spirit potion<br> | ||
| + | [[File:Supreme Health Potion.gif|link=]] 1-16x supreme health potion<br> | ||
| + | [[File:Mastermind Potion.gif|link=]] 1-5x mastermind potion<br> | ||
| + | [[File:Bullseye Potion.gif|link=]] 1-5x bullseye potion<br> | ||
| + | [[File:Berserk Potion.gif|link=]] 2-5x berserk potion | ||
| + | </td> | ||
| + | </tr> | ||
| + | <tr> | ||
| + | <td align="left" valign="top"> | ||
| + | <center>[[Gem Atelier|'''Gems''']] | ||
| + | [[File:Lesser Marksman Gem.gif|link=]][[File:Lesser Mystic Gem.gif|link=]][[File:Lesser Sage Gem.gif|link=]][[File:Lesser Guardian Gem.gif|link=]][[File:Lesser Spiritualist Gem.gif|link=]][[File:Lesser Ninja Gem.gif|link=]] | ||
| + | |||
| + | [[File:Marksman Gem.gif|link=]][[File:Mystic Gem.gif|link=]][[File:Sage Gem.gif|link=]][[File:Guardian Gem.gif|link=]][[File:Spiritualist Gem.gif|alt=]][[File:Ninja Gem.gif|link=]] | ||
| + | |||
| + | [[File:Greater Marksman Gem.gif|link=]][[File:Greater Mystic Gem.gif|link=]][[File:Greater Sage Gem.gif|link=]][[File:Greater Guardian Gem.gif|link=]][[File:Greater Spiritualist Gem.gif|alt=]][[File:Greater Ninja Gem.gif|link=]] | ||
| + | </center> | ||
| + | </td> | ||
| + | <td align="left" valign="top"> | ||
| + | <center>[[Pet Upgrading#Boosts|'''Pet Boost Tokens''']] | ||
| + | [[File:petice.gif|link=]][[File:petdeath.gif|link=]][[File:petholy.gif|link=]][[File:petfire.gif|link=]][[File:petenergy.gif|link=]][[File:petearth.gif|link=]] | ||
| + | |||
| + | [[File:petphysical.gif|link=]][[File:petdistance.gif|link=]][[File:petmagic.gif|link=]][[File:petdmg.gif|link=]][[File:petmelee.gif|link=]]</center> | ||
| + | </td> | ||
| + | <td align="left" valign="top"> | ||
| + | <center>'''[[Jewelry]]'''</center> | ||
| + | [[File:Giant Amethyst.gif|link=]]giant amethyst<br> | ||
| + | [[File:Giant Ruby.gif|link=]] 1-2x giant ruby | ||
| + | |||
| + | [[File:Giant Emerald.gif|link=]]1-2x giant emerald | ||
| + | |||
| + | [[File:Giant Topaz.gif|link=]]1-2x giant topaz | ||
| + | |||
| + | [[File:Giant Sapphire.gif|link=]]giant sapphire | ||
| + | </td> | ||
| + | </tr> | ||
| + | </table> | ||
| + | |||
<table class="wikitable sortable"> | <table class="wikitable sortable"> | ||
<tr> | <tr> | ||
Revision as of 22:51, 11 August 2026
Boss
To go back to bosses page, click here

Boss Info
 Classification: Archfoe
 Location: Cobra's Bastion
 Health: 3.1kk
 Experience: 2.5kk
Bosstiary Progress
 Prowess: 5 kills
 Expertise: 20 kills
 Mastery: 40 kills
Loot Table
|
|
|
|
|
|
     |
|


 piece of timira's sensors
 one of timira's many heads


| Item | Amount | Probability |
|---|---|---|
crystal coin |
3-6x | 100% |
ultimate mana potion |
1-16x | 33% |
mastermind potion |
1-5x | 28.6% |
ultimate spirit potion |
1-16x | 25.3% |
bullseye potion |
1-5x | 20.9% |
supreme health potion |
1-16x | 16.5% |
giant amethyst |
1x | 8.8% |
giant ruby |
1-2x | 7.7% |
berserk potion |
2-5x | 7.7% |
boss coin |
1-2x | 7% |
giant emerald |
1-2x | 5.5% |
giant topaz |
1-2x | 4.4% |
giant sapphire |
1x | 3.3% |
cobra axe |
1x | 3% |
cobra wand |
1x | 3% |
cobra blade |
1x | 3% |
cobra mace |
1x | 3% |
cobra plate |
1x | 3% |
cobra hood |
1x | 3% |
theurgic amulet |
1x | 3% |
cobra greaves |
1x | 3% |
cobra crossbow |
1x | 3% |
cobra boots |
1x | 3% |
lesser guardian gem |
1x | 0.8% |
lesser marksman gem |
1x | 0.8% |
lesser mystic gem |
1x | 0.8% |
lesser sage gem |
1x | 0.8% |
lesser ninja gem |
1x | 0.8% |
pet holy resistance boost |
1x | 0.6% |
pet fire resistance boost |
1x | 0.6% |
pet ice resistance boost |
1x | 0.6% |
pet earth resistance boost |
1x | 0.6% |
| pet physical resistance boost |
1x | 0.6% |
pet energy resistance boost |
1x | 0.6% |
pet death resistance boost |
1x | 0.6% |
mystic gem |
1x | 0.6% |
guardian gem |
1x | 0.6% |
sage gem |
1x | 0.6% |
marksman gem |
1x | 0.6% |
ninja gem |
1x | 0.6% |
relic chest |
1x | 0.4% |
| pet distance skill boost |
1x | 0.4% |
| pet melee skill boost |
1x | 0.4% |
| pet damage boost |
1x | 0.4% |
| pet magic level boost |
1x | 0.4% |
greater marksman gem |
1x | 0.3% |
greater sage gem |
1x | 0.3% |
greater mystic gem |
1x | 0.3% |
greater ninja gem |
1x | 0.3% |
greater guardian gem |
1x | 0.3% |
Location
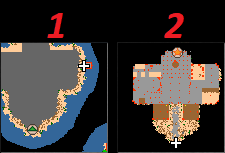
1. Take the waypoint to Roshalor - Cobra's Bastion
2. Follow the maps below.
3. To face Scarlett Ezel, pull the lever.
You can go either solo or with other 4 players.
Mechanics
First of all: turn your auto targeting off.
Scarlett Ezel will spawn north on her throne in a place full of pillars with mirrors. 
She is almost immune to all kind of damage in this state and she has a temper, so don't try dealing any damage in this state.
Weakening Scarlett
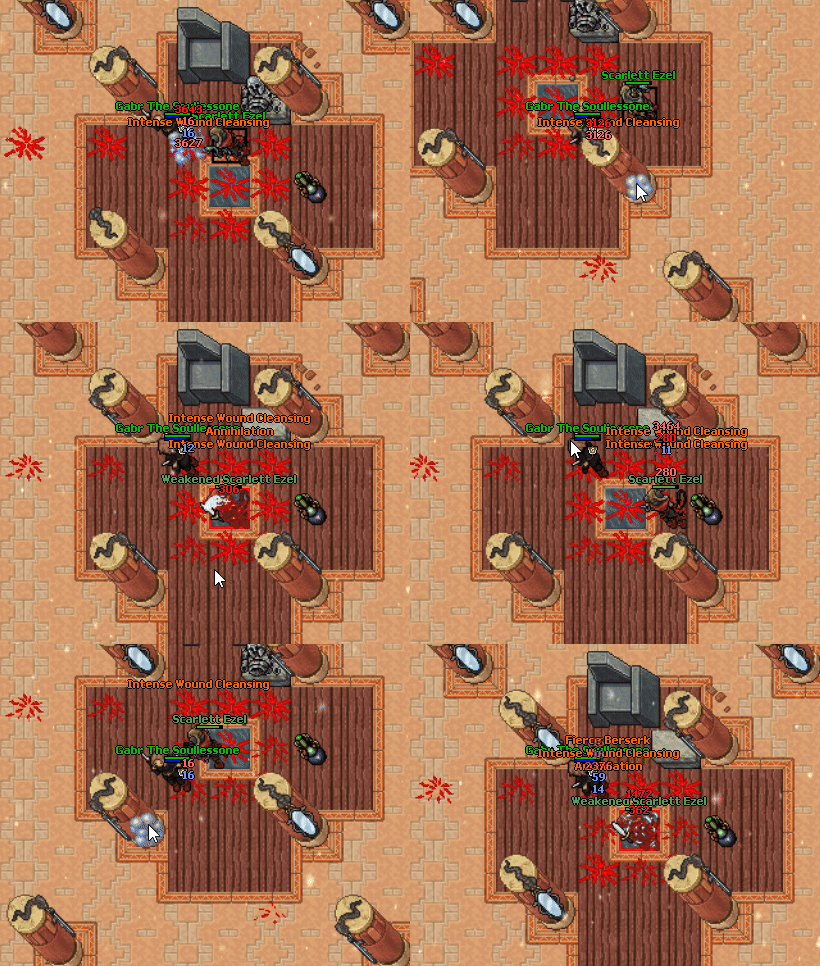
To weaken Scarlett, you must right-click on the pillars until the mirrors face the center of the room.
Not being fast enough will make the pillars to random their position, so do it as fast as you can.
Once you did, click on the Galthen's Chestplate  and she will get trapped and weakened for 7 seconds.
Use this 7 seconds to deal all damage possible to her, and once it turns back to the normal state, stop attacking her.
Enraged Scarlett
Dealing damage to Scarlett without doing the mechanics, or being too slow to rotate the pillars, will make her pissed off.
Once it turns into her Enraged form, she will deal tons of damage, so consider running away dodging the falling mechanics inside the room.
After a while, she will turn back to the "regular Scarlett", and you'll be able to do the mirror mechanics again.